
Introduction
Wouldn’t it be nice if your IoT devices can send notifications to your phone you when they detect something unusual or they are about to perform some actions? Since ESP32 can connect to the Internet, we can use different IoT platforms to help us exchange data across different devices. Previously, we use Adafruit IO to store data from ESP32, as well as to get input from a smartphone.
This time, we will use another IoT platform called IFTTT. IFTTT integrates a wide range of online services, so it is possible to use one online service (say, Twitter) to trigger a chain of events in other services (say, Gmail or Facebook). In particular, we will use a very versatile IFTTT service called Webhooks to send messages from ESP32 to a smartphone.
In this tutorial, you will learn:
- how to create an applet on IFTTT,
- how to send a message from ESP32 to Telegram via IFTTT.
We will use a DHT11 sensor to measure temperature and humidity with an ESP32, and send the data to Telegram periodically via IFTTT.

Materials and Tools
- ESP32 x 1
- DHT11 x 1
- Jumper wires
Prerequisites
There are a few tutorials that you can read to get yourself ready for this tutorial.
- If you have not installed the Thonny IDE to your computer or flashed the MicroPython firmware to the ESP32, you should follow this tutorial to do so.
- If you want to know how to use the DHT11 sensor with MicroPython and ESP32, you can take a look of this tutorial.
- If you want to know how to use ESP32 and MicroPython to send HTTP requests, you can check out this tutorial.
NOTE: While it’s not a must, some understanding on HTTP will help you complete this tutorial. Check out this tutorial if you need a brief review on HTTP.
Create a Webhooks applet in IFTTT
First, you need to register a free account on IFTTT. Also, to connect Telegram to IFTTT, you need to install Telegram on your computer.
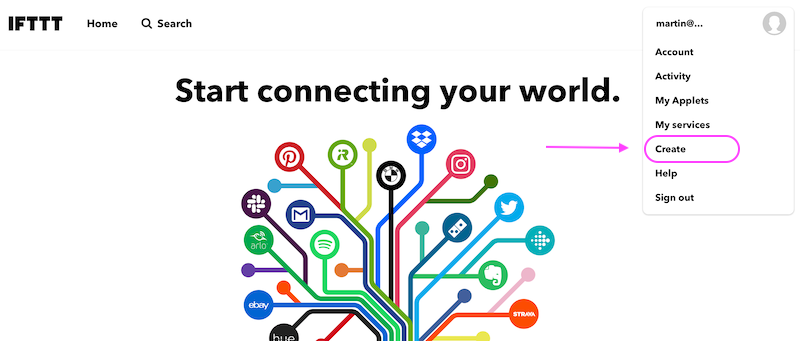
After logging to IFTTT, click the ‘head’ icon at the top right hand corner to see the menu. In the menu, click Create.
On the ‘Create’ page, you can see ‘If This Then That’ (this is what IFTTT stands for). As the name implies, we need to set up a trigger (‘if this’) and the corresponding action (‘then that’) for an applet. To add a trigger, click the ‘+’ between ‘If’ and ‘This’.

As you can see, there are a wide variety of services that can be used as the trigger.
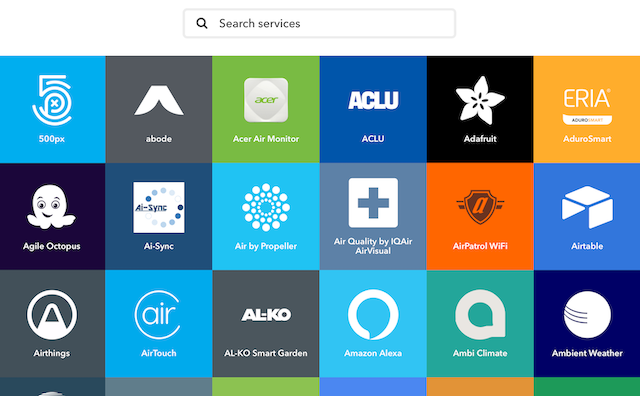
In the search field, type ‘Webhooks’. Then, click the Webhooks icon.

Follow the steps below to set up the applet.
1. Add Webhooks Service to IFTTT

Click the Connect button. We need to enable Webhooks service in the IFTTT account in order to use this.

Then, click Receive a web request. As mentioned in the description, the trigger is fired when an HTTP request with a specific URL is sent to IFTTT.

Enter the event name to create the trigger. Let’s just call it ‘esp32’ for simplicity.
2. Add Telegram Service to IFTTT

Click the ‘+’ between ‘then’ and ‘that’.

Again, we can choose from a wide variety of services for the corresponding action. Enter ‘Telegram’ in the search field, and click the Telegram icon.

Click the Connect button. At the stage, Telegram needs to be launched.

Click SEND MESSAGE to launch Telegram.
When Telegram is launched, the IFTTT chatbot will be opened. Click the Start button in the chatbot.

Then, click ‘Authorize IFTTT’ to allow IFTTT to send messages to Telegram.

The Telegram service is then added to your IFTTT account. Click the Back button at the top left hand corner. Search ‘Telegram’ and click the Telegram icon again. This time, there are a few actions that we can use.
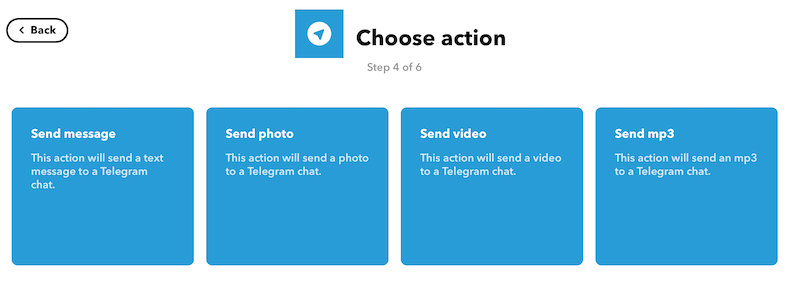
Click the Send message button.
3. Configure the Telegram Action
We can configure a template for the message sent from IFTTT to Telegram. In the ‘Message text’ section, we can write the template. We can use ,, etc., to represent the parameters (data) sent to IFTTT. These will be replaced by the actual values when the message is sent to Telegram. We can use the following as the template to display the temperature and the humidity in a Telegram message.
What: <br>
When: <br>
Temperature: , Humidity:
NOTE: We can add HTML tags to stylize the message.

Click Create Action when it’s done.
Finally, click the Finish button to create the Applet.

Get the URL
In IFTTT, click the ‘head’ button at the top right hand corner to see the menu, and select My Services. Then, select Webhooks.
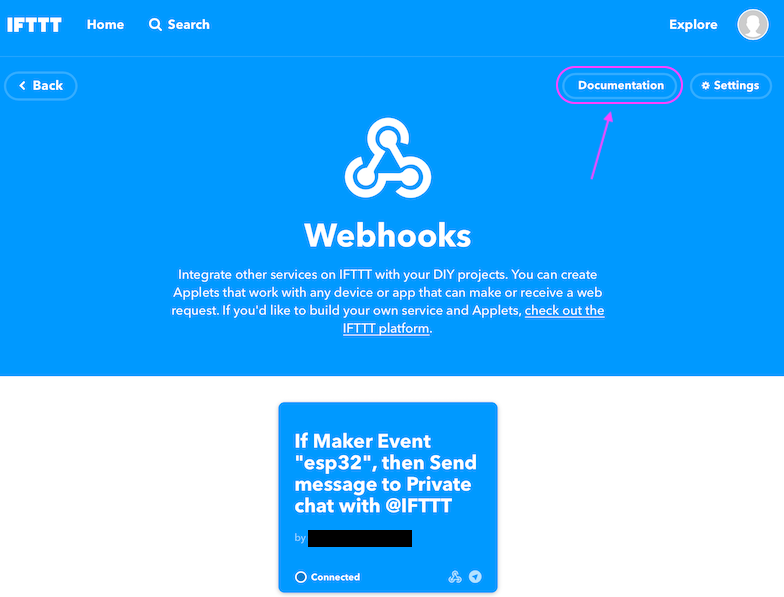
You can see the Applet we just created. Click Documentation at the top. A new page is opened, and an URL is shown on that page.

Replace {event} with esp32 (which is the event name we set for the applet) and copy the URL. We will use this URL to send data to IFTTT in the Python program.
Send Notifications from ESP32
Connect the DHT11 sensor to ESP32 as shown in the table.
| DHT11 sensor | ESP32 |
|---|---|
| VCC | 3.3V |
| GND | GND |
| DATA | Pin 15 |
Then, we write the Python program. First, we import the libraries and the functions that we need to use.
import network
import urequests as requests
from machine import Pin
from dht import DHT11
from time import sleep
Next, we define a few constants.
wifi_ssid = "YOUR_WIFI_SSID"
wifi_password = "YOUR_WIFI_PASSWORD"
webhook_url = "https://maker.ifttt.com/trigger/esp32/with/key/YOUR_IFTTT_KEY"
You should replace the strings of the variables wifi_ssid, wifi_password and webhook_url with your own Wifi SSID, Wifi password and Webhooks URL copied in the last step.
Then, we connect the ESP32 to the Wifi station and create an object of DHT11 class.
sta_if = network.WLAN(network.STA_IF)
sta_if.active(True)
sta_if.connect(wifi_ssid, wifi_password)
while not sta_if.isconnected():
    print(".", end = "")

dht11 = DHT11(Pin(15))
After that, we can create the main loop with the while keyword.
while True:
In the main loop, we first measure the temperature and the humidity.
    dht11.measure()
    temperature = dht11.temperature()
    humidity = dht11.humidity()
Then, we construct and send an HTTP request. Since we use HTTP GET to send the data to IFTTT, the parameters are directly attached to the URL. ? is appended to the URL first, and each parameter is appended to the URL in the form of parameter_name=variable_value. Two parameters are separated by &.
In Webhooks, the names of the parameters are value1, value2, value3, etc., so we can construct the URL as follows:
url = webhook_url + "?value1=" + str(temperature) + "&value2=" + str(humidity)
Note that temperature and humidity are numbers, so they need to be converted into strings before being appended to the URL string.
Finally, we send the HTTP request.
    try:
        r = requests.get(url)
        print(r.text)
    except Exception as e:
        print(e)
    sleep(300)
This will send a message to Telegram with the temperature and the humidity every 5 minutes.
Press Ctrl + F2 to restart the MicroPython REPL, then press F5 to run the script in Thonny. The program will start sending messages to Telegram!

You may find the sample code here, and ask us on our Facebook page if you have any problems.
Conclusion
Webhooks in IFTTT is a simple way to send notifications to smartphones. Other than Telegram, we can use other services like Line and Gmail to receive notifications. Since a trigger can be fired by a simple HTTP GET request, Webhooks in IFTTT can be used in many scenarios as long as Internet access is available. You may try it with Raspberry Pi, ESP8266 or even Arduino with the Ethernet shield by yourself.