Introduction
When we use a camera in a Raspberry Pi project, we either use a CSI camera or an USB camera. These cameras need to be attached to the Raspberry Pi, and sometimes it can be an issue. Wouldn’t it be great if can add a wireless camera to the Raspberry Pi? Some ESP32 boards have a built-in camera, and it is extremely easy to get photos or stream video from an ESP32-based camera.
In this tutorial, we will learn:
- how to turn an ESP32 with a built-in camera into a video streaming server
- how to get the video from the ESP32 and do some processing on the video
To learn the above things, we will modify the image classification program from TensorFlow Lite so that it classifies the video from the ESP32 instead of the Pi Camera.
Tools and Materials
- Raspberry Pi 4
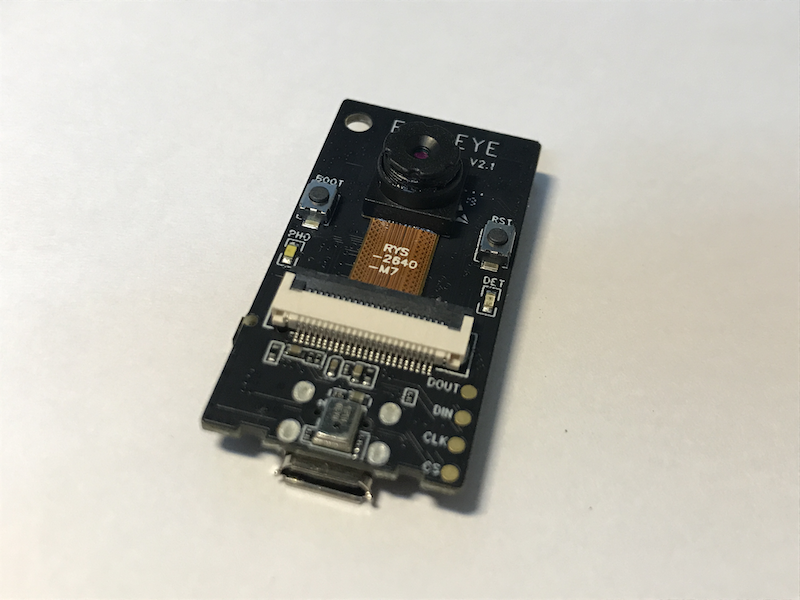
- ESP-EYE
Prerequisites
Before the tutorial, make sure you have:
- understood the basic concept of image recognition with machine learning,
- created and activated a Python virtual environment on your Raspberry Pi,
- installed TensorFlow Lite runtime in the virtual environment If you haven’t done them yet, follow this tutorial to do so.
Flash the ESP32 program
Before flashing the program, make sure that you have installed the Arduino core for ESP32. If you have not done so, check out this tutorial to install it via the board manager.
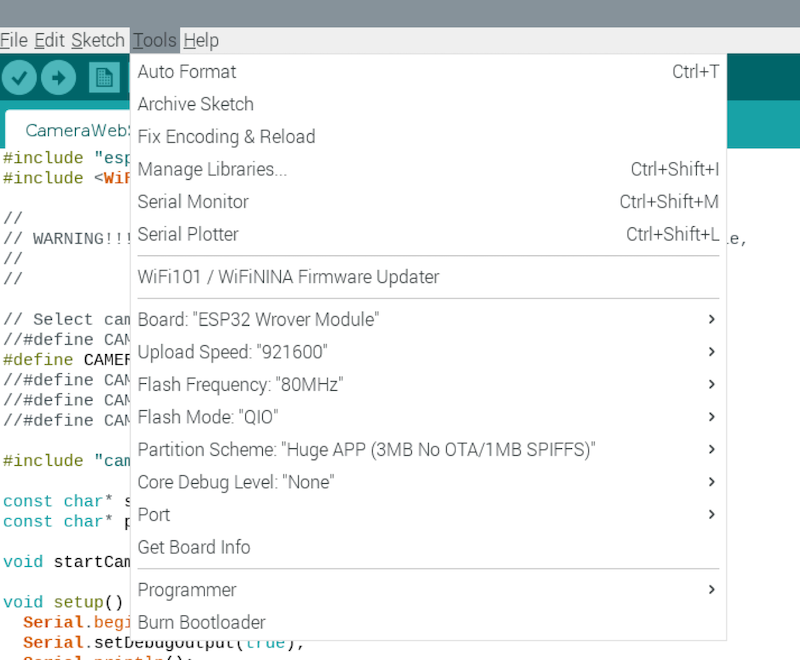
If the Arduino core for ESP32 is installed, click Tools &rarr Board &rarr ESP32 Wrover Module in the Arduino IDE. Then, click Tools → Partition Scheme → Huge APP.
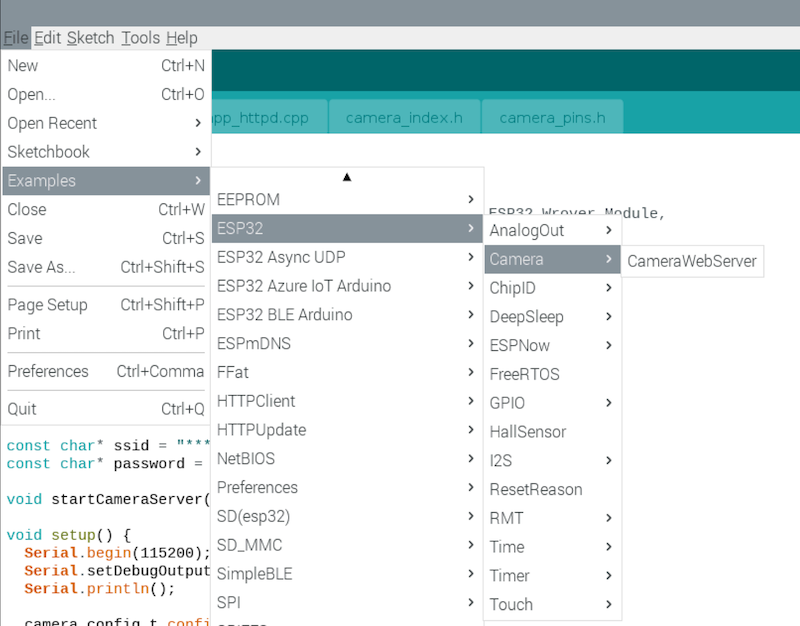
After that, we can open the Camera Web Server sketch, which is included in the Arduino core for ESP32. Click File → Examples → ESP32 → Camera → CameraWebServer.s
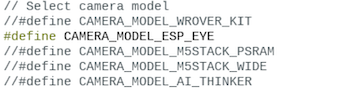
We need to select the camera model at the top. Uncomment the camera model used (in our case, ESP-EYE) and comment out others.
After that, change the Wifi credential inside the sketch. Then, we can upload the sketch to the ESP-EYE. When the upload is completed, we can see the status of the ESP-EYE inside the Serial Monitor. Note down the IP address of the ESP-EYE.

Enter the IP address of the ESP-EYE in the browser. We can now stream video from the ESP-EYE!
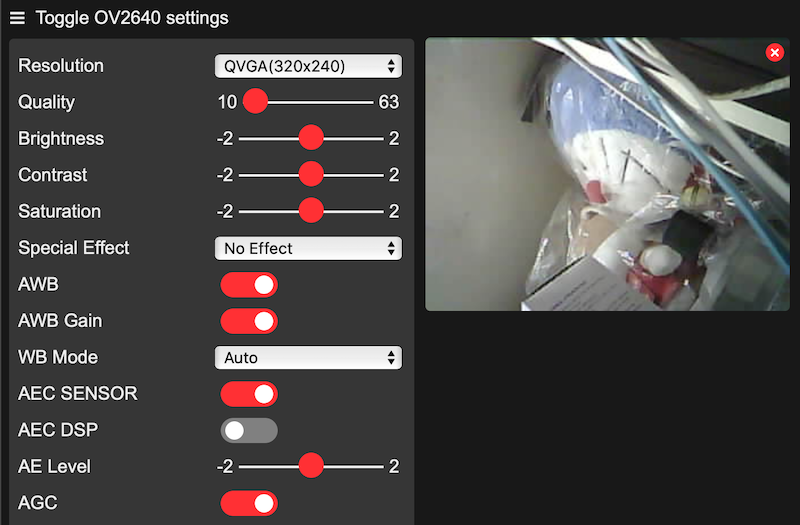
NOTE: Only one client can be served by the streaming server on the ESP-EYE at a time.
Install OpenCV on Raspberry Pi
It’s time to work on the Raspberry Pi. First, We need to install the dependencies of the OpenCV library. You may copy and execute the following commands one by one, or download and execute this shell script.
(tfl) pi@raspberrypi:~/ai$ sudo apt-get install libjpeg-dev libtiff5-dev libjasper-dev libpng-dev -y
(tfl) pi@raspberrypi:~/ai$ sudo apt-get install libavcodec-dev libavformat-dev libswscale-dev libv4l-dev -y
(tfl) pi@raspberrypi:~/ai$ sudo apt-get install libxvidcore-dev libx264-dev -y
(tfl) pi@raspberrypi:~/ai$ sudo apt-get install libfontconfig1-dev libcairo2-dev -y
(tfl) pi@raspberrypi:~/ai$ sudo apt-get install libgdk-pixbuf2.0-dev libpango1.0-dev -y
(tfl) pi@raspberrypi:~/ai$ sudo apt-get install libgtk2.0-dev libgtk-3-dev -y
(tfl) pi@raspberrypi:~/ai$ sudo apt-get install libatlas-base-dev gfortran -y
(tfl) pi@raspberrypi:~/ai$ sudo apt-get install libhdf5-dev libhdf5-serial-dev libhdf5-103 -y
(tfl) pi@raspberrypi:~/ai$ sudo apt-get install libqtgui4 libqtwebkit4 libqt4-test python3-pyqt5 -y
After the installation of the dependencies, we can install the OpenCV library.
(tfl) pi@raspberrypi:~/ai$ pip install opencv-contrib-python==4.1.0.25
We may run the Python interpreter and check whether the OpenCV library is installed correctly.
import cv2
print(cv2.__version__)
Finally, we install the requests library.
(tfl) pi@raspberrypi:~/ai$ pip install requests
Modify the Image Classification Program from TensorFlow
Make a copy of ‘classify_picamera.py’ as mentioned in this tutorial and open it. Then, we import the necessary libraries.
import requests
from io import BytesIO
import cv2
The requests library will send HTTP requests to the ESP-EYE and stream the video data. The video data are put together by using the BytesIO library. Finally, we use OpenCV to display the video.
Then, we comment out the codes in the main function that uses the Raspberry Pi’s camera.
# with picamera.PiCamera(resolution=(640, 480), framerate=30) as camera:
#     camera.start_preview()
#     try:
#       stream = io.BytesIO()
#       for _ in camera.capture_continuous(
#           stream, format='jpeg', use_video_port=True):
#         stream.seek(0)
#         image = Image.open(stream).convert('RGB').resize((width, height),
#                                                          Image.ANTIALIAS)
#         start_time = time.time()
#         results = classify_image(interpreter, image)
#         elapsed_ms = (time.time() - start_time) * 1000
#         label_id, prob = results[0]
#         stream.seek(0)
#         stream.truncate()
#         camera.annotate_text = '%s %.2f\n%.1fms' % (labels[label_id], prob,
#                                                     elapsed_ms)
#     finally:
#       camera.stop_preview()
After the commented codes, we first define a variables for the IP address of the ESP-EYE and the URL of the streaming server.
ip_addr = '192.168.2.29'
stream_url = 'http://' + ip_addr + ':81/stream'
Then, we create an HTTP GET request to stream the content from the ESP server.
res = requests.get(stream_url, stream=True)
Next, we read the image data streamed from the ESP server, process it with OpenCV and make inference with TensorFlow Lite.
for chunk in res.iter_content(chunk_size=100000):
if len(chunk) > 100:
try:
start_time = time.time()
img_data = BytesIO(chunk)
cv_img = cv2.imdecode(np.frombuffer(img_data.read(), np.uint8), 1)
cv_resized_img = cv2.resize(cv_img, (width, height), interpolation = cv2.INTER_AREA)
results = classify_image(interpreter, cv_resized_img)
elapsed_ms = (time.time() - start_time) * 1000
label_id, prob = results[0]
cv2.putText(cv_img, f'{labels[label_id]}', (0,25), cv2.FONT_HERSHEY_SIMPLEX, 0.5, (255, 0, 255), 2)
cv2.putText(cv_img, f'{prob}', (0, 50), cv2.FONT_HERSHEY_SIMPLEX, 0.5, (255, 0, 255), 2)
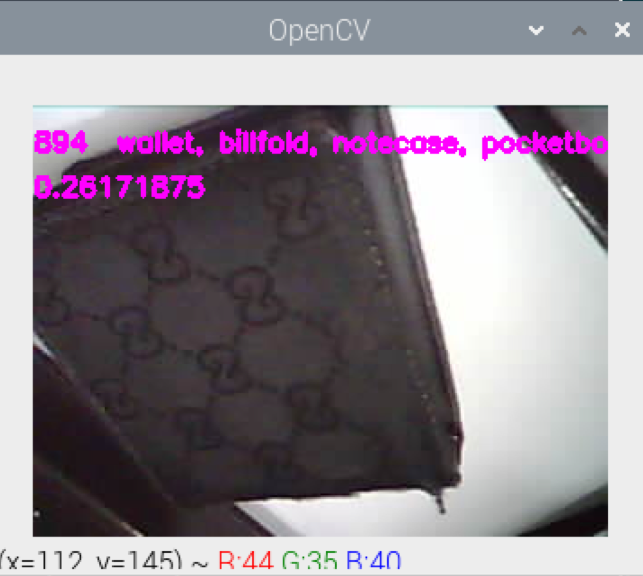
cv2.imshow("OpenCV", cv_img)
cv2.waitKey(1)
print(f'elapsed_ms: {elapsed_ms}')
except Exception as e:
print(e)
continue
Let’s explore the important parts of the above code .
There are some meta-data in the streaming data. We set a threshold of 100 byte to differentiate the meta-data from the image data:
if len(chunk) > 100:
Then, the ByteIO library is used to turn the streamed data into a byte array that OpenCV can read:
img_data = BytesIO(chunk)
Next, we turn the raw byte data into an OpenCV image and resize it:
        cv_img = cv2.imdecode(np.frombuffer(img_data.read(), np.uint8), 1)
        cv_resized_img = cv2.resize(cv_img, (width, height), interpolation = cv2.INTER_AREA)
Similar to the original code inside classify_picamera.py, we use TensorFlow Lite to make inference with the image:
        results = classify_image(interpreter, cv_resized_img)
        label_id, prob = results[0]
Finally, we add labels to the image and display it:
        cv2.putText(cv_img, f'{labels[label_id]}', (0,25), cv2.FONT_HERSHEY_SIMPLEX, 0.5, (255, 0, 255), 2)
        cv2.putText(cv_img, f'{prob}', (0, 50), cv2.FONT_HERSHEY_SIMPLEX, 0.5, (255, 0, 255), 2)
        cv2.imshow("OpenCV", cv_img)
        cv2.waitKey(1)
Run the Python program, and we can see the Raspberry Pi do image classification on the video from the ESP32!
You may find the sample code on Github.
Conclusion and Assignment
ESP32-based cameras can add a lot of flexibility to AI projects. For instance, we may stream videos from multiple ESP32 cameras to a more powerful computer and perform AI inference. Also, ESP32 is a lot smaller, cheaper and consumes less power, it’s more suitable for projects like RC cars.
As a practice, you may do the same modification on detect_picamera.py and use the video from ESP32 for object detection.